We Found the Best Wood Table Sealer
So you either have or are thinking of purchasing a wooden topped table. Depending on its condition, you may be doing all the research on caring for your table and trying to figure out what do you seal a wooden table with? You may be wondering, what do I use as a wood table sealer? I found a beautiful handmade farmhouse table at in antique store a few years ago. I am going to walk you through the steps I took to prepare the table for everyday use.
When you paint a table top you will need to consider a few things. How will you use the table? Where will it be sitting? Will it be used indoors or outdoors? I will walk you through understanding what is a good wood table sealer and how to seal a wood dining table.
After learning these simple and easy steps, you will be a pro at protecting your new DIY table or thrifted find. This is seriously a very simple DIY.

This post is all about how to seal a wood dining table.
Before we get to the meat of this post, I have to give you the potatoes! You have to hear how I acquired this beautiful farmhouse table.
We were out antiquing with my brother and his then girlfriend, not anticipating buying anything really. Just enjoying a quiet Mother’s day Sunday shopping antiques. I saw the top of the table and didn’t really investigate it too much. Then, my wonderful shopping buddy took a closer look and said “did you see this?”. I said, yes, but I’m not sure about it. She said, “are you kidding me?, “look at those legs”! And, then I did. I looked and that was it. To top it off, it was on sale!
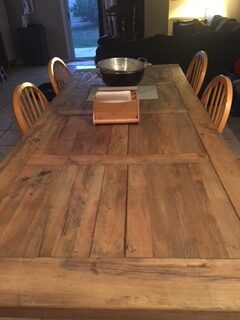
Okay now it might not be in a price range for everyone, but this is a handmade, solid wood table. It is 86″ long and 31″ tall. It’s a massive, sturdy table made from a repurposed solid wood door. And that’s the best purpose of this post. You can take from this example and fix up a thrifted find.
One thing it lacked, though, was a sealed top. For years I kept this beautiful table covered, and that kind of defeated the purpose of buying the table. We couldn’t enjoy and appreciate it’s beauty. Well, not anymore! We solved the issue, and here’s how we did it.
Tools and supplies you’ll need:
A good sealer: We used General Finishes Water Based Topcoat High Performance in Semi-Gloss finish. This is because it worked for the look we were going for. I wanted it glossy enough to perform well (easy clean up), but not too shiny to distract from the simple design.
Flat head screwdriver: I just used this to open the can of finish.
Stirring stick: Be sure to stir the product. DO NOT SHAKE IT. I actually have thrifted old wooden rulers in my craft room used just for projects like this.
Paint brush: You can use a synthetic bristle brush, a foam brush, a pad applicator, or a roller. We used a foam brush for this project.
Clean lint free rags/cloths: Here’s the kind we recommend. Pro-Clean Basics White Knit Rags.
For additional tips, read our post on Painting Furniture with Chalk Paint
Prepare the furniture:
Clean: I used a clean dish towel with warm water and liquid dish soap. If you know me, I’m using Dawn liquid dish soap.
Let it dry (give it as long as needed). You can shop for your supplies while it dries.
Sand: Using a 120 grit foam sanding sponge, I gave the top a good sanding. I used a hand sander/sponge on this table since the table was already sanded down and prepped by the talented table builder. Plus, the product I used on this project recommended this method. This product also recommends you DO NOT USE STEEL WOOL IN THIS PROCESS.
Dust: Wipe away with a clean lint free cloth. Better yet, vacuum the dust using the hose attachment of your vacuum. After the dust was cleaned off, I used a cloth that was rinsed with warm water. It will give it a good final cleaning.
NOTE: This product will not darken the wood as a stain, but the natural look of the wood will certainly be enhanced by the added moisture.


Application
Safety first. Be sure you are working in a well-ventilated area.
Apply first coat. Make sure your table is clean and dry. Apply with smooth, even strokes and light tap lines. Avoid heavy pressure or back brushing. Also, you’ll notice this first coat is going to sink into the wood, literally. The wood will probably just soak it all up, so apply liberally. Check for any drip marks. You’ll want to catch those with the brush before it dries.
The product recommends at least two hours for drying time, but I would let this sit overnight.

Apply the second coat. Sand with a 220 grit foam sanding sponge.
Wipe with clean lint free cloth.
Again, liberally and check for any drip marks.
Let this sit overnight

And, if you think you need it, apply a third coat. You know the drill…
Apply the third coat. Sand with a 220 grit foam sanding sponge.
Wipe with clean lint free cloth.
Again, liberally and check for any drip marks.

Then wait…let it cure for a few days.
7 days is good.
14 days is better.
21 days is best.
Trust me. The wait is worth it.
This post was all about how to seal a wood dining table, which can absolutely be applied to any wood table or furniture project you’re working on. Best of luck!


What’s in my coffee this morning? I am a big fan of collagen powders. The one I’m drinking these days is Rae Vegan Collagen Boost Powder.
And yes, it gives me the boost I need to start my day!


