DIY Painting Furniture with Chalk Paint
Updating your home decor with a DIY furniture painting project can be an easy refresh, especially if you are painting with chalk paint. It can also be a bit intimidating if you are a beginner. If you are like me, you’re probably doing all the research you possibly can to make sure you are ready to start the work. As a beginner DIY’er myself, I’m going to walk you through the steps I took to paint an IKEA daybed frame.
You’ll not only learn how to paint furniture with chalk paint, you’ll also learn how to seal chalk paint, how to get a professional paint furniture look, and some great furniture painting ideas!
After learning about painting with chalk paint, you are going to feel like an expert and ready for even more DIY furniture painting when you are done!

This post is all about the best tips for DIY furniture painting with chalk paint.
The project:
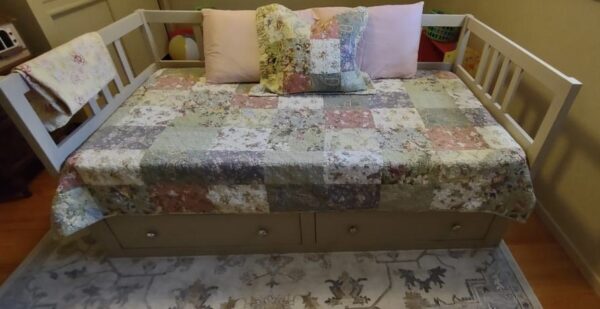
My dad bought a simple daybed from Ikea, but after he brought it home, he decided he wanted something else. No one else wanted it, so I took it off his hands. I thought, this design would fit nicely in my guest room, with some DIY paint.
This daybed is similar to the IKEA BRIMNES Daybed frame with 2 drawers, except this bed includes the attached side and back rail. This is what makes it so much more appealing. You’ll see when it’s all finished. Here’s the before picture…

Tools and supplies I used:
Here’s a list of tools and supplies I used (and links to similar products):
- Paint and wax — I use Annie Sloan and sometimes Valspar Chalky Finish Paint and Wax. It’s a very good product. For the project I discuss in this post, I used both Valspar and Annie Sloan products. I find Annie Sloan products at local antique/craft stores.
- Brushes — You’ll need a good quality brush designed for chalk paint and waxes. Check out this link to a chalk paint and wax brush set.
- Lint-free cloths — You can use old used 100% cotton t-shirts or check out this link to a pack of 100% cotton rags.
- Flat head screwdriver (to open paint can)
- Soap and water
- Wooden paint stirrer
How to paint furniture with chalk paint:
- Disassemble all the pieces.
- Remove all the hardware.
- Clean with some soap and water. I use Dawn Liquid dish soap (just a very small drop is needed) and plain water and rag.
- Allow time for all pieces to dry well.
- Make sure you have good ventilation in your work area.
- Paint first coat of paint to all pieces, and allow time to dry–be sure to immediately remove any bristles that might fall off your paint brush.
- For a rustic, faded look, one coat will do. For more coverage, add a second coat.
- At this step, and after applying the desired coats of paint, you are done.

How to seal chalk paint:
Note: If you want a worn, weathered look, skip these steps and move to “Adding an antiqued or weathered look”.
- Make sure you have a good ventilation in your work area.
- Apply to your dried furniture piece in small sections at a time. We used Valspar Sealing Wax, to finish the look of this project.
- Use a dry lint free cloth to wipe away any excess.
- Continue until all pieces have been sealed. Dries pretty quickly.

Adding an antiqued or weathered look:
- For a weathered look, use a 120-medium grit sponge, gently scrape at corners and seams of the furniture item (where you would normally see wear).
- Apply a wax coating. Use a separate brush for the clear wax and wipe away any excess wax with a clean, dry cloth. We used Valspar Sealing Wax, to finish the look of this project, OR…
- If you want to achieve an antiqued finish, apply the clear wax in a small section, then apply a varnish wax, like Valspar Antiquing Wax. Use a separate brush for the antiquing wax and gently wipe away to reveal a slight darkening in the creases or corners of the furniture. Work in small sections so the clear wax is not dry before applying the antiquing wax.
TIP: If the darker wax is too dark, you can remove some of it with the clear wax until you achieve the look you prefer.
Finishing the project:
- After all paint is applied and desired effects are completed, put all the pieces together.
- Add all hardware and accessories. We added some beautiful Antique Chrome Octagon Mercury Distressed Glass Dresser Knobs.
For a great laundry hack using Dawn Liquid dish soap, read our related post here: How to Remove Tough Stains from Clothes

This post was all about the best tips for DIY furniture painting with chalk paint.
For even more great furniture painting ideas, check out this book I used by Annie Sloan. This helped me learn to be more comfortable using chalk paint for my project.
Did you know there are recipes for painting furniture? Check out this book by Annie Sloan: Color Recipes for Painted Furniture.
Let’s keep in touch. Sign up for the FREE Spoonful of Moments newsletter.


